It seems like Docker containers are almost everywhere nowadays when it comes to developing and shipping software. My first touch with the technology was a few years ago and it’s been serving me well ever since.
In this tutorial I’ll teach you what docker is and show you how to containerize three applications written in Rails, Vue.js & Flask.
What is Docker?
Docker is a tool that enables developers to easily package, ship and run applications via lightweight, portable containers.
Compared to virtual machines, docker containers consume a lot less resources, can be created in seconds and are highly portable, which makes sharing software applications a breeze :)
What problem does Docker solve?
… but it doesn’t work on my machinenew colleague starting the project
I’m sure you’ve heard that before (and if you haven’t you will soon). That’s a pain that containers solve for developers. They ensure consistency of the environment where applications run in.
Containers encapsulate applications with all of their dependencies like libraries, interpreters, source code, configuration files as well as all system related dependencies.
In other words, containers hold everything you need to run an application. Hence, once you’ve built and containerized your app, then every other developer that has docker installed can run it regardless of their OS and without worrying about providing the right infrastructure.
No more questions of the sort: Which node version should I switch to to run the app? or What version of X(system library) do you have on your Ubuntu?
What is a docker image?
An image is like a template/blueprint for an application. The image itself doesn’t run the application, but defines all necessary commands to create an environment for an application to run properly. Those commands are specified in a special text file - Dockerfile.
What is a docker container?
Containers are isolated areas/packages that are based on images. Containers run applications inside them. You can start and stop containers.
General flow for dockerizing an application is:
- Add a Dockerfile
- Build an image based on the Dockerfile
- Run a container based on the image.
Learn how to dockerize your Rails, Vue.js and Flask apps
Prerequisites
- MacOS (with ruby 2.6.2 & node 12.4.0)
- Minimum of 10 GB of free disk space
- Docker Desktop
- Web development fundamentals
To keep this tutorial practical let’s create a setup that’s closer to what a real project might involve. Let’s dockerize a Todos application (yeah I know, it’s always a todo) that consists of:
- Vue.js SPA for creating a todo on front-end side
- Rails app (in api mode) serving as a rest api
- Flask app that we’ll treat as a separate service which synchronizes new todos with other systems
Let’s create our rails app
rails new todos-api --api -Tusing -T to exclude the default testing framework - Minitest
Add rack-cors and http gems (needed for tutorial):
cd todos-api
echo "gem 'rack-cors', '~> 1.1', '>= 1.1.1'" >> Gemfile
echo "gem 'http', '~> 4.4', '>= 4.4.1'" >> Gemfile
bundle install
and configure cors to allow requests from all origins.
Let’s add a Todo resource with scaffolding
rails g scaffold Todo description:stringLet’s migrate to add our Todo model
rails db:migrateGreat, we have our todo rails app now. Let’s dockerize it:
touch DockerfileThe root folder of your rails app should look like this:
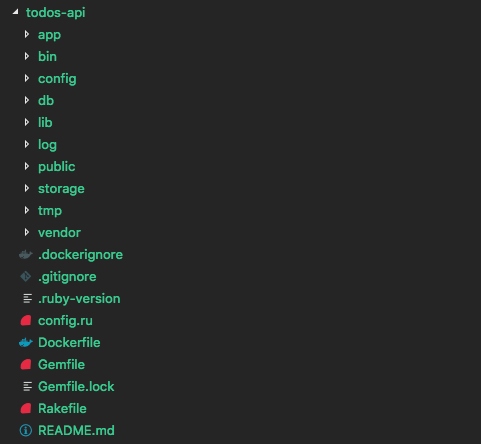
And here’s how my Dockerfile looks like:
FROM ruby:2.6.2

RUN mkdir /todosapi

WORKDIR /todosapi

COPY Gemfile /todosapi
COPY Gemfile.lock /todosapi
RUN bundle install

COPY . /todosapi

CMD ["rails", "server", "-b", "0.0.0.0"]
FROM indicates the parent image that your image will be based on. It’s ruby:2.6.2 in our case as we have a Rails app and it uses ruby 2.6.2, so we want to have it installed on our image.
By default public images like ruby:2.6.2 are pulled from DockerHub - a hosted repository service provided by Docker.
RUN executes a command and with the second line we create /todosapi directory
WORKDIR sets the working directory where RUN, CMD, ADD, COPY will be executed in.
COPY naturally copies files. Since working directory is already set this line copies Gemfile and Gemfile.lock in it (/todosapi).
bundle install installs the gems
next line copies source code to working directory
CMD sets default command. Here we spin up our rails application. CMD can also be overwritten when running the container.
RUN vs CMD?
Dockerfile commands can be divided in two groups: build-time and run-time. Build-time commands like RUN, WORKDIR and COPY are commited to the container image and each of them add a layer on top of the parent image. CMD is a run-time command and so is executed when a container is run.
Since images consist of layers, we cache installing gems by copying Gemfile & Gemfile.lock and the rest of the source code in three separate COPY commands and so separate layers. That way (assuming the Gemfiles haven’t changed) each build after the first one won’t recreate the layer responsible for installing gems (bundle install) as it will compare it with the layer from the current image.
Similarly to .gitignore you can add .dockerignore file. It lists files and directories that’ll be excluded before the build process starts. You might want to exclude any sensitive data like master keys, credentials, dependency directories like /vender, /node_modules etc. Here’s ours:
.git
.gitignore
vendor/
config/master.key
/log/*
/tmp/*
Dockerfile
Now, let’s move to using docker cli and execute our first docker command to build the image.
docker build . -t todosapiwith -t or –tag we name the image and can optionally add a tag in the name:tag format. The default tag is latest.
The first time it might take some time to build the image. While building it, you should see the layers being added one by one in your terminal. Here’s how a part of mine looks like:

you can list your newly created image with:
docker imagesnow let’s run a container off of todosapi image:
docker run -d -p 3005:3000 --name=api_container todosapiwith -d (or –detach) we run the container in background mode
with -p 3005:3000 (or –expose) we bind the port 3000 of container to port 3005 of the host machine. I.e. we’re exposing the container to the host using that port pair.
with –name=api_container we name our container (otherwise a random name will be given to it). You can also start and stop images via name:
docker stop api_container
docker start api_container
Since we ran the container in detached mode, you can check its status with:
docker psUnder STATUS you can see how long your container’s been running for. Open localhost:3005 in your browser and see the home screen of your rails app :) Since we added a Todo resource you can also test adding a todo with curl:
curl -X POST localhost:3005/todos -d "todo[description]=Brush my teeth"Open localhost:3005/todos in your browser and check out your first todo :) Congrats!
you can also inspect your container logs using its name:
docker logs api_containerLet’s create our Vue.js app now following the official guide:
install vue cli if absent:
# depending on your package manager
npm install -g @vue/cli @vue/cli-service-global
# or
yarn global add @vue/cli @vue/cli-service-global
then create a vue project:
cd ..
vue create todos-app
I added axios:
cd todos-app
yarn add axios
and created a simple Todos.vue component that lists todos and allow users to add new ones.
Then let’s dockerize it:
# todos-app/Dockerfile
FROM node:12.4.0

RUN mkdir /todosapp

WORKDIR /todosapp

COPY package.json /todosapp
COPY yarn.lock /todosapp
RUN yarn install

COPY . /todosapp

CMD ["yarn", "serve"]
It’s quite similar to the Dockerfile for the Rails app. We start from node:12.4.0 parent image, set up the working directory, cache dependencies by installing them as a seprate layer, copy souce and run the app.
Add a .dockerignore too:
.git
.gitignore
node_modules/
Dockerignore
Now, let’s build and run it:
docker build . -t todosapp
docker run -d -p 8080:8080 --name=app_container todosapp
Open localhost:8080 and start adding your todos :) Congrats!
Now let’s pretend we had a requirement that says each new todo has to be synchronized with another system and we were provided with the api of an http service that handles the synchronization. And our job was to integrate with that service. This is where our Flask app comes into play. We’ll use it to simulate the service.
The reason I’m including a Flask app is to show you how you can dockerize a simple python app as well as how to access one container from another. In our case we’ll have to call the Flask container from the Rails container using the former’s hostname.
This can be done via docker networking, but first let’s create and dockerize our flask app. Following the official quickstart guide we create a very simplistic synchronizer
Then add the Dockerfile:
# todos-synchronizer/Dockerfile
FROM python:3.7

RUN mkdir /synchronizer

WORKDIR /synchronizer
COPY requirements.txt /synchronizer
RUN pip install -r requirements.txt

COPY . /synchronizer
ENV FLASK_APP synchronize.py

CMD ["flask", "run", "--host", "0.0.0.0"]
ENV is a new command. With it we set environment variables. When put in Dockerfile they’re mostly used to define default values. They can also be passed like: docker run -e <key>=<value>
Then build it:
docker build . -t todos-synchronizer
Now let’s alter the code so that our rails app calls the flask service:
# todos-api/app/models/todo.rb
class Todo < ApplicationRecord
  # SYNCHRONIZER_URL will be provided run-time when creating the container
  SYNCHRONIZER_URL = ENV.fetch('SYNCHRONIZER_URL').freeze

  after_create :synchronize

  private

  def synchronize
    HTTP.post("#{SYNCHRONIZER_URL}/sync_todo", json: attributes)
  end
end
Now every time we create a new todo, Flask service will be called to synchronize the todo. We’ll have to rebuild the api image now so that it has the latest changes:
cd ../todos-api
# build new image
docker build . -t todosapi
# stop running container
docker stop api_container
# clean up stopped containers & dangling images
docker system prune
Building the image again means you’ll end up with two images for todosapi and if you don’t clean up stale images you can quickly run out of disk space - docker system prune to the rescue.
Important General tip: when using docker locally to build images always ensure you have enough disk space and remove unused and dangling images. They can be up to a few GBs in size and you can run out of space in no time and find yourself in a trouble. To remove a single image: docker rmi <image_id>
Now let’s create a new docker network and then add both api_container and synchronizer_container to it. This will allow using conatiners’ names as hostnames:
# create docker network
docker network create todos_network
# run container
docker run -d --name=synchronizer_container todos-synchronizer
# connect container to network
docker network connect todos_network synchronizer_container
# run container
docker run -d -p 3005:3000 \
        --name=api_container \
        -e SYNCHRONIZER_URL="http://synchronizer_container:5000" \
        todosapi
# connect container to network
docker network connect todos_network api_container
Notice that we didn’t expose synchronizer_container to the host via a port with -p option. That’s because it’ll only be accessed from api_container and we don’t need to access it locally like app_container and api_container. When adding containers to a network, containers’ names serve as hostnames, so we passed SYNCHRONIZER_URL=”http://synchronizer_container:5000” as an environment variable with -e option.
Congrats! Open localhost:8080, add a todo and check that your Flask app is processing todos for synchronization:
docker logs synchronizer_container
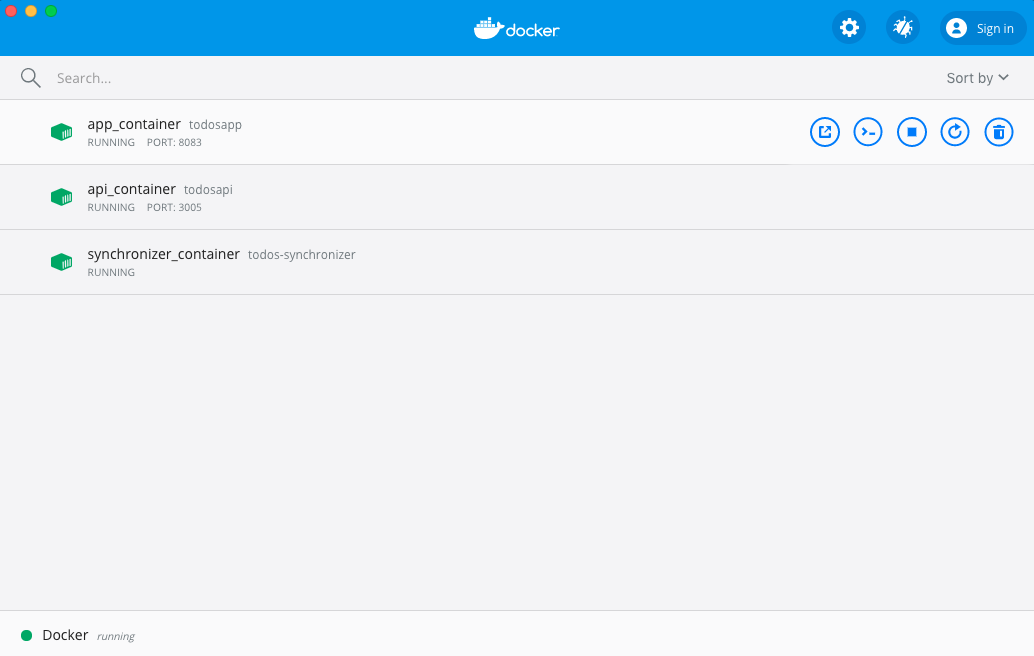
You can also use Docker Desktop’s dashboard to inspect logs. From there you can easily stop, restart, delete and ssh into containers too:
Creating a netowk and manually linking containers to it is not always practical, especially when you have multi-container applications. In those cases Docker Compose fits the bill perfectly. Go ahead and check Part 2
Clean up docker resources
Running the whole setup we ended up with 3 running containers and 6 images (3 for Rails, Vue, Flask apps & 3 for their parent images - ruby, node, python). Those can take quite a bit of disk space and RAM, so to clean up:
# stop running containers
docker stop $(docker ps -q)
# remove stopped containers, dangling images, unused networks
docker system prune
# remove all images
docker rmi $(docker images -aq)
You can find the source code in my github dockerize-rails-vue-flask.
I hope this was helpful to you! Have fun programming :)


Comments